Android Oauth Client an Unexpected Error Occurred Please Try Again Later
The OAuth-based Google Sign-in "Streamlined" linking type adds Google Sign-In on peak of OAuth-based account linking. This provides seamless voice-based linking for Google users while as well enabling business relationship linking for users who registered to your service with a non-Google identity.
This linking type begins with Google Sign-In, which allows you to cheque if the user's Google profile information exists in your system. If the user's information isn't institute in your organisation, a standard OAuth menstruum begins. The user can also choose to create a new business relationship with their Google profile information.
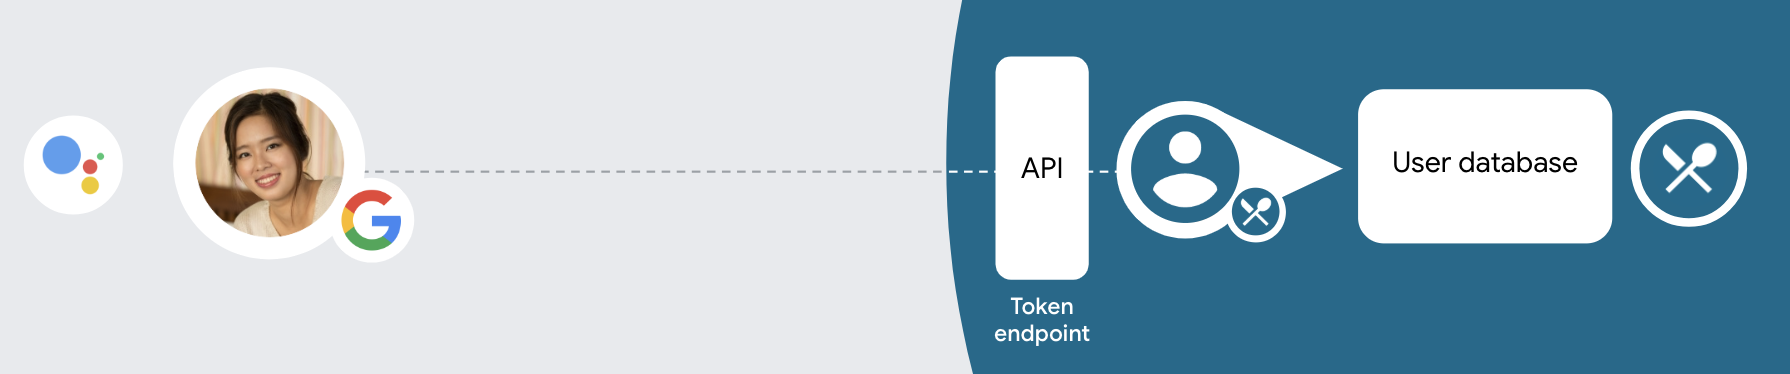
To perform business relationship linking with the Streamlined linking type, follow these general steps:
- First, enquire the user to give consent to access their Google profile.
- Use the information in their profile to identify the user.
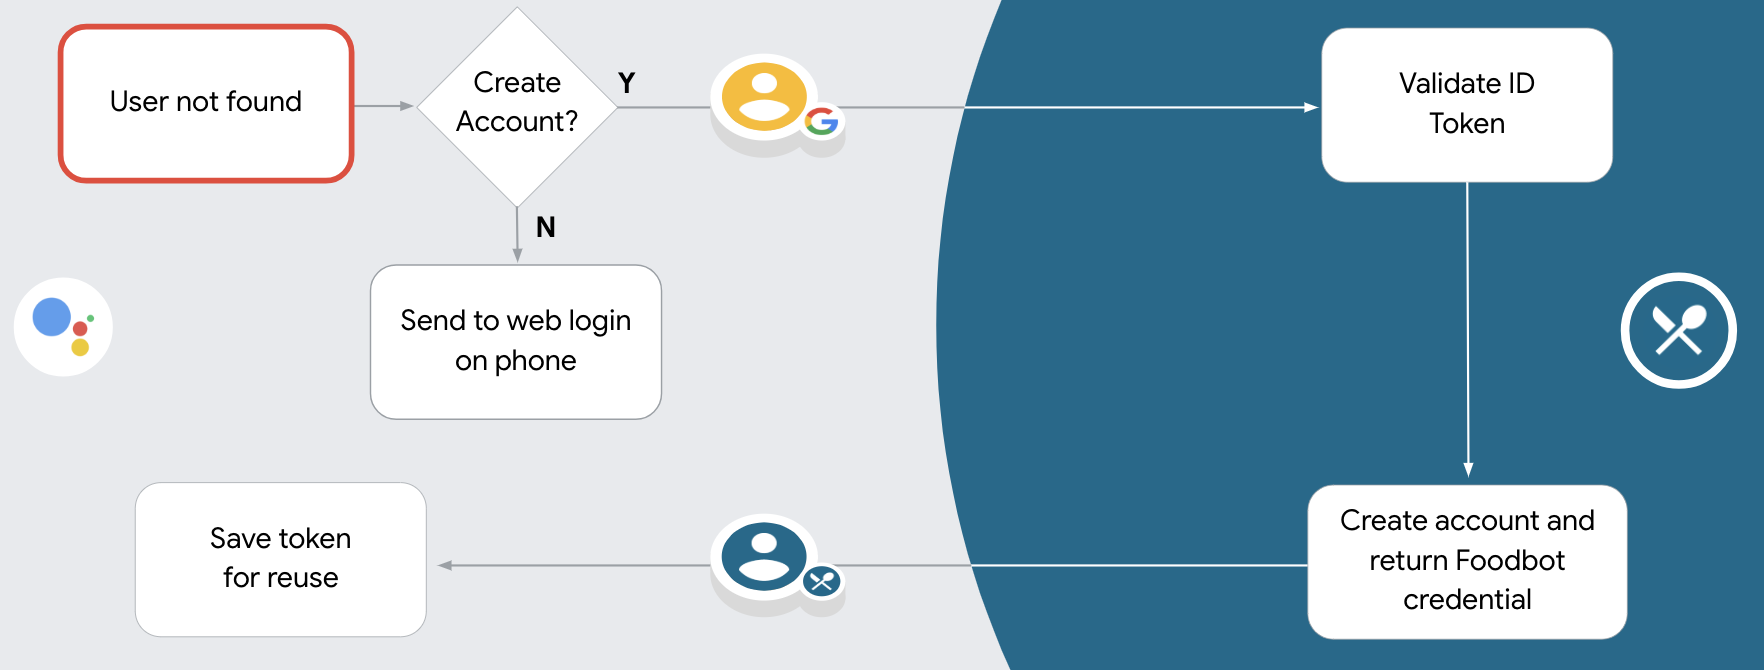
- If y'all tin can't observe a match for the Google user in your authentication organisation, the catamenia proceeds depending on whether you lot configured your Actions project in the Actions panel to permit user account cosmos via vox or only on your website.
- If you allow account cosmos via vocalisation, validate the ID token received from Google. You lot can then create a user based on the profile data contained in the ID token.
- If you don't allow account creation via voice, the user is transferred to a browser where they tin can load your authorization page and complete the user creation catamenia.
Support account creation via voice
If you allow user business relationship cosmos via vocalisation, Assistant asks the user whether they want to do the following:
- Create a new business relationship on your system using their Google account information, or
- Sign in to your hallmark system with a unlike account if they accept an existing non-Google business relationship.
Allowing account creation via vocalization is recommended if you desire to minimize the friction of the account creation flow. The user just needs to leave the voice menstruation if they desire to sign in using an existing not-Google business relationship.
Disallow account creation via vocalism
If you disallowed user business relationship creation via vocalism, Assistant opens the URL to the web site that you provided for user authentication. If the interaction is happening on a device that doesn't take a screen, Assistant directs the user to a telephone to continue the account linking menstruum.
Disallowing creation is recommended if:
-
You lot practise not want to allow users that have non-Google accounts to create a new user account and want them to link to their existing user accounts in your authentication system instead. For example, if you offer a loyalty programme, you might want to make sure that the user doesn't lose the points accrued on their existing account.
-
Yous need to have full control of the account creation flow. For example, you could disallow creation if you need to testify your terms of service to the user during account creation.
Implement OAuth-based Google Sign-in "Streamlined" linking
Accounts are linked with manufacture standard OAuth 2.0 flows. Actions on Google supports the implicit and authorization code flows.
In the implicit lawmaking flow, Google opens your authorisation endpoint in the user's browser. After successful sign in, yous return a long-lived access token to Google. This access token is now included in every request sent from the Assistant to your Activity.
In the authorization code flow, you need two endpoints:
- The authorization endpoint, which is responsible for presenting the sign-in UI to your users that aren't already signed in and recording consent to the requested access in the form of a brusk-lived authorization code.
- The token substitution endpoint, which is responsible for ii types of exchanges:
- Exchanges an potency lawmaking for a long-lived refresh token and a brusque-lived access token. This substitution happens when the user goes through the account linking flow.
- Exchanges a long-lived refresh token for a short-lived admission token. This exchange happens when Google needs a new access token because the one it had expired.
Although the implicit code flow is simpler to implement, Google recommends that access tokens issued using the implicit flow never expire, because using token expiration with the implicit flow forces the user to link their account again. If y'all demand token expiration for security reasons, you should strongly consider using the auth code flow instead.
Configure the project
To configure your project to use Streamlined linking, follow these steps:
- Open the Actions console and select the project you want to use.
- Click on the Develop tab and choose Account linking.
- Enable the switch next to Account linking.
- In the Account creation department, select Yes.
-
In Linking type, select OAuth & Google Sign In and Implicit.
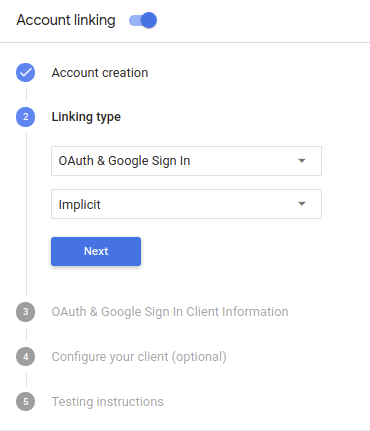
-
In Client Information, exercise the following:
- Assign a value to Client ID issued past your Actions to Google to identify requests coming from Google.
- Insert the URLs for your Authorisation and Token Exchange endpoints.
-
Click Relieve.
Implement your OAuth server
To support the OAuth 2.0 implicit flow, your service makes an authorization endpoint bachelor by HTTPS. This endpoint is responsible for authenticating and obtaining consent from users for data access. The say-so endpoint presents a sign-in UI to your users that aren't already signed in and records consent to the requested admission.
When your Activeness needs to call i of your service'due south authorized APIs, Google uses this endpoint to go permission from your users to phone call these APIs on their behalf.
A typical OAuth two.0 implicit flow session initiated by Google has the post-obit flow:
- Google opens your potency endpoint in the user's browser. The user signs in if non signed in already, and grants Google permission to access their data with your API if they haven't already granted permission.
- Your service creates an access token and returns it to Google by redirecting the user's browser back to Google with the admission token attached to the request.
- Google calls your service's APIs, and attaches the access token with each request. Your service verifies that the access token grants Google dominance to access the API and then completes the API call.
When your Action needs to perform account linking via an OAuth ii.0 implicit flow, Google sends the user to your potency endpoint with a request that includes the post-obit parameters:
| Dominance endpoint parameters | |
|---|---|
client_id | The client ID you assigned to Google. |
redirect_uri | The URL to which you ship the response to this request. |
state | A bookkeeping value that is passed back to Google unchanged in the redirect URI. |
response_type | The type of value to return in the response. For the OAuth 2.0 implicit menstruum, the response type is always token. |
For example, if your authorization endpoint is bachelor at https://myservice.case.com/auth, a request might look like:
Go https://myservice.example.com/auth?client_id=GOOGLE_CLIENT_ID&redirect_uri=REDIRECT_URI&state=STATE_STRING&response_type=token
For your authorisation endpoint to handle sign-in requests, do the following steps:
-
Verify the
client_idandredirect_urivalues to prevent granting access to unintended or misconfigured customer apps:- Confirm that the
client_idmatches the customer ID you assigned to Google. - Confirm that the URL specified past the
redirect_uriparameter has the following form:https://oauth-redirect.googleusercontent.com/r/YOUR_PROJECT_ID
YOUR_PROJECT_ID is the ID found on the Project settings page of the Actions Console.
- Confirm that the
-
Cheque if the user is signed in to your service. If the user isn't signed in, consummate your service'south sign-in or sign-up flow.
-
Generate an admission token that Google will utilise to admission your API. The access token can exist whatever string value, but information technology must uniquely represent the user and the client the token is for and must not be guessable.
-
Send an HTTP response that redirects the user'southward browser to the URL specified by the
redirect_uriparameter. Include all of the following parameters in the URL fragment:-
access_token: the admission token yous simply generated -
token_type: the stringbearer -
country: the unmodified state value from the original asking The following is an example of the resulting URL:https://oauth-redirect.googleusercontent.com/r/YOUR_PROJECT_ID#access_token=ACCESS_TOKEN&token_type=bearer&state=STATE_STRING
-
Google'southward OAuth 2.0 redirect handler volition receive the admission token and confirm that the state value hasn't inverse. After Google has obtained an access token for your service, Google volition attach the token to subsequent calls to your Action as office of the AppRequest.
Handle automated linking
After the user gives your Action consent to access their Google profile, Google sends a request that contains a signed assertion of the Google user'southward identity. The exclamation contains data that includes the user'due south Google Account ID, proper noun, and email address. The token commutation endpoint configured for your project handles that request.
If the corresponding Google business relationship is already present in your authentication organization, your token exchange endpoint returns a token for the user. If the Google account doesn't friction match an existing user, your token exchange endpoint returns a user_not_found error.
The request has the following form:
POST /token HTTP/1.1 Host: oauth2.example.com Content-Type: awarding/x-world wide web-form-urlencoded grant_type=urn:ietf:params:oauth:grant-blazon:jwt-bearer&intent=get&assertion=JWT&consent_code=CONSENT_CODE&scope=SCOPES
Your token substitution endpoint must be able to handle the post-obit parameters:
| Token endpoint parameters | |
|---|---|
grant_type | The blazon of token beingness exchanged. For these requests, this parameter has the value urn:ietf:params:oauth:grant-blazon:jwt-bearer. |
intent | For these requests, the value of this parameter is `get`. |
exclamation | A JSON Web Token (JWT) that provides a signed assertion of the Google user'due south identity. The JWT contains information that includes the user's Google Account ID, proper name, and email address. |
consent_code | Optional: When nowadays, a 1-time code that indicates that the user has granted consent for your Action to access the specified scopes. |
telescopic | Optional: Any scopes y'all configured Google to request from users. |
When your token exchange endpoint receives the linking request, it should do the following:
Validate and decode the JWT exclamation
You can validate and decode the JWT exclamation by using a JWT-decoding library for your language. Use Google's public keys (available in JWK or PEM format) to verify the token's signature.
When decoded, the JWT assertion looks similar the following example:
{ "sub": 1234567890, // The unique ID of the user's Google Account "iss": "https://accounts.google.com", // The assertion's issuer "aud": "123-abc.apps.googleusercontent.com", // Your server's client ID "iat": 233366400, // Unix timestamp of the assertion'south creation time "exp": 233370000, // Unix timestamp of the assertion's expiration time "name": "Jan Jansen", "given_name": "January", "family_name": "Jansen", "email": "jan@gmail.com", // If present, the user'southward electronic mail address "locale": "en_US" } In addition to verifying the token's signature, verify that the exclamation's issuer (iss field) is https://accounts.google.com and that the audience (aud field) is the client ID assigned to your Action.
Check if the Google account is already present in your authentication organization
Check whether either of the post-obit weather are true:
- The Google Account ID, found in the exclamation's
subfield, is in your user database. - The email address in the exclamation matches a user in your user database.
If either condition is true, the user has already signed up and yous can outcome an access token.
If neither the Google Account ID nor the email address specified in the assertion matches a user in your database, the user hasn't signed up yet. In this case, your token exchange endpoint should reply with a HTTP 401 fault, that specifies error=user_not_found, every bit in the following example:
HTTP/i.1 401 Unauthorized Content-Type: application/json;charset=UTF-eight { "error":"user_not_found", } When Google receives the 401 error response with a user_not_found fault, Google calls your token exchange endpoint with the value of the intent parameter prepare to create and sending an ID token that contains the user'due south profile data with the asking.
Handle business relationship creation via Google Sign-In
When a user needs to create an account on your service, Google makes a request to your token exchange endpoint that specifies intent=create, as in the following example:
Post /token HTTP/i.1 Host: oauth2.example.com Content-Blazon: application/x-www-grade-urlencoded response_type=token&grant_type=urn:ietf:params:oauth:grant-blazon:jwt-bearer&telescopic=SCOPES&intent=create&consent_code=CONSENT_CODE&exclamation=JWT[&NEW_ACCOUNT_INFO]
The assertion parameter contains A JSON Web Token (JWT) that provides a signed assertion of the Google user'southward identity. The JWT contains information that includes the user's Google Account ID, proper name, and electronic mail address, which yous can use to create a new account on your service.
To respond to account cosmos requests, your token commutation endpoint must practise the following:
Validate and decode the JWT exclamation
Y'all can validate and decode the JWT assertion by using a JWT-decoding library for your language. Use Google's public keys (available in JWK or PEM format) to verify the token's signature.
When decoded, the JWT exclamation looks like the following example:
{ "sub": 1234567890, // The unique ID of the user's Google Account "iss": "https://accounts.google.com", // The assertion's issuer "aud": "123-abc.apps.googleusercontent.com", // Your server's client ID "iat": 233366400, // Unix timestamp of the assertion'due south creation time "exp": 233370000, // Unix timestamp of the assertion's expiration time "name": "Jan Jansen", "given_name": "January", "family_name": "Jansen", "email": "jan@gmail.com", // If nowadays, the user's electronic mail address "locale": "en_US" } In addition to verifying the token's signature, verify that the assertion's issuer (iss field) is https://accounts.google.com and that the audition (aud field) is the customer ID assigned to your Action.
Validate user information and create new account
Check whether either of the following atmospheric condition are true:
- The Google Account ID, found in the assertion'due south
subfield, is in your user database. - The email address in the assertion matches a user in your user database.
If either condition is true, prompt the user to link their existing account with their Google Business relationship by responding to the asking with an HTTP 401 error, specifying error=linking_error and the user's e-mail accost as the login_hint, as in the following example:
HTTP/1.1 401 Unauthorized Content-Type: awarding/json;charset=UTF-8 { "fault":"linking_error", "login_hint":"foo@bar.com" } If neither condition is true, create a new user account using the information provided in the JWT. New accounts do not typically take a password ready. It is recommended that you lot add Google Sign In to other platforms to enable users to log in via Google across the surfaces of your awarding. Alternatively, you tin can electronic mail the user a link that starts your password recovery flow to let the user to fix a password for signing in on other platforms.
When the creation is completed, result an access token and render the values in a JSON object in the trunk of your HTTPS response, like in the post-obit case:
{ "token_type": "Bearer", "access_token": "ACCESS_TOKEN", "expires_in": SECONDS_TO_EXPIRATION } Design the voice user interface for the authentication period
Bank check if the user is verified and start the account linking flow
- Open your Actions Architect project in the Deportment Panel.
- Create a new scene to kickoff business relationship linking in your Action:
- Click Scenes.
- Click the add (+) icon to add a new scene.
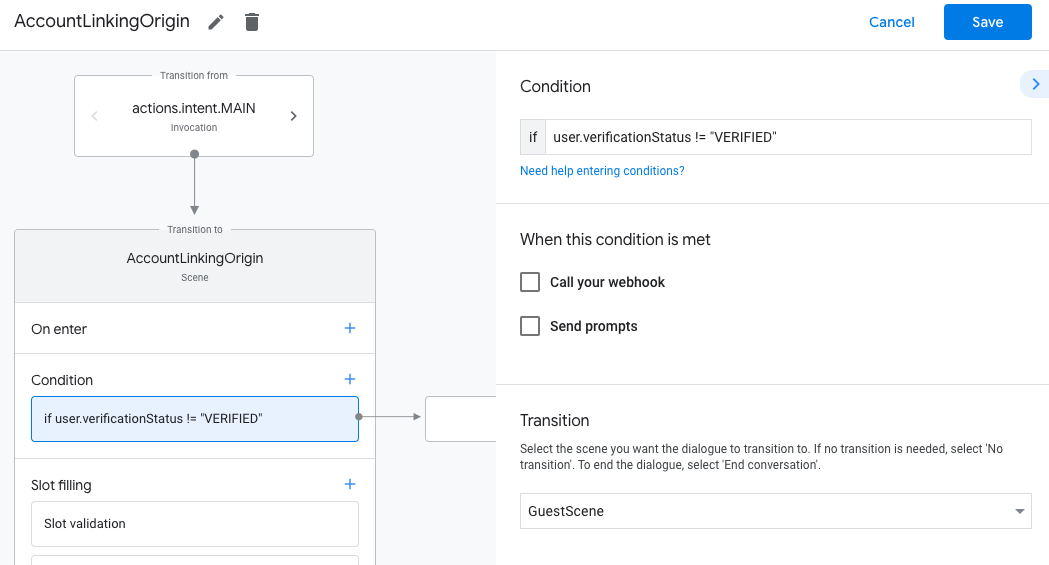
- In the newly created scene, click the add icon for Conditions.
- Add a condition that checks if the user associated with the conversation is a a verified user. If the check fails, your Action can't perform business relationship linking during the conversation, and should fall back to providing access to functionality that doesn't crave account linking.
- In the
Enter new expressionfield nether Condition, enter the following logic:user.verificationStatus != "VERIFIED" - Nether Transition, select a scene that doesn't require business relationship linking or a scene that is the entry point to guest-only functionality.
- In the
- Click the add together icon for Weather condition.
- Add together a status to trigger an account linking flow if the user doesn't have an associated identity.
- In the
Enter new expressionfield under Status, enter the following logic::user.verificationStatus == "VERIFIED" - Under Transition, select the Account Linking organization scene.
- Click Save.
- In the
![]()
Afterwards saving, a new business relationship linking organization scene called <SceneName>_AccountLinking is added to your project.
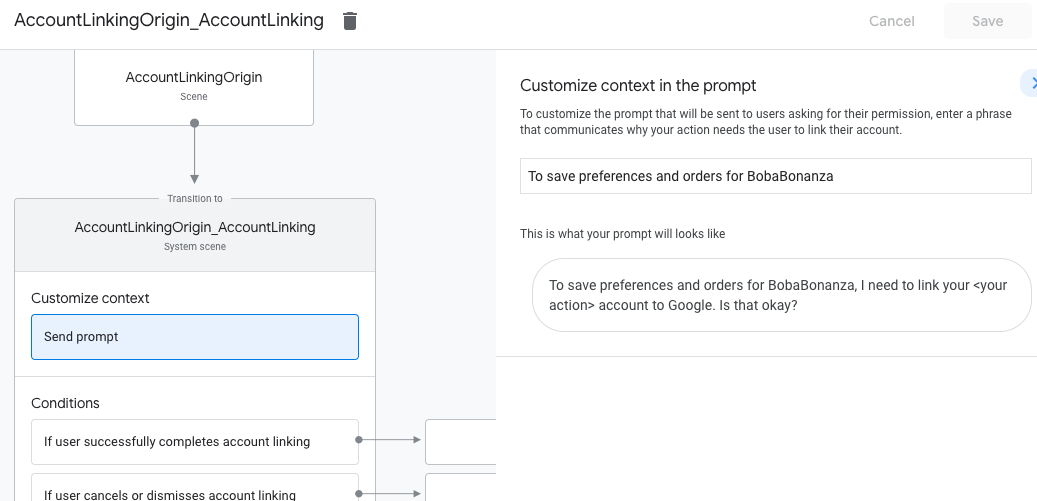
Customize the business relationship linking scene
- Under Scenes, select the business relationship linking organization scene.
- Click Send prompt and add a brusque sentence to depict to the user why the Action needs to admission their identity (for example "To save your preferences").
- Click Save.
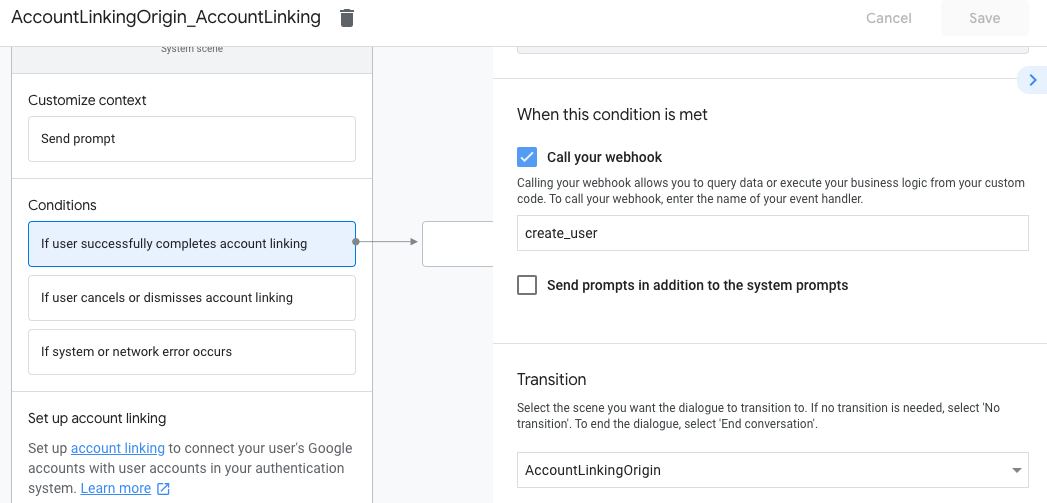
- Under Weather condition, click If user successfully completes account linking.
- Configure how the flow should proceed if the user agrees to link their account. For example, call the webhook to process whatever custom business logic required and transition dorsum to the originating scene.
- Click Save.
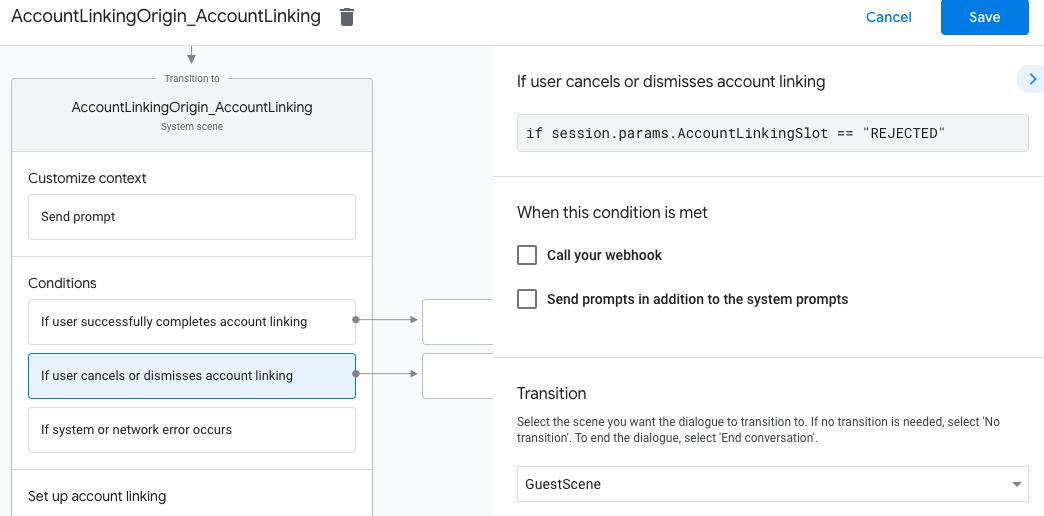
- Under Atmospheric condition, click If user cancels or dismisses account linking.
- Configure how the flow should continue if the user doesn't agree to link their account. For example, send an acknowledging message and redirect to scenes that provide functionality that doesn't crave account linking.
- Click Save.
- Nether Conditions, click If arrangement or network mistake occurs.
- Configure how the menstruation should proceed if the account linking flow can't be completed because of arrangement or network errors. For example, send an acknowledging bulletin and redirect to scenes that provide functionality that doesn't require account linking.
- Click Save.
Handle data access requests
If the Assistant request contains an access token, check first that the access token is valid and not expired and and so retrieve from your user account database the user business relationship associated with the token.
Source: https://developers.google.com/assistant/identity/google-sign-in-oauth
0 Response to "Android Oauth Client an Unexpected Error Occurred Please Try Again Later"
Post a Comment